Manage Advisors & Staff
Last updated September 22, 2026
Workspace owners and admins manage the people inside their agency from Settings → Advisors. Start here when you are adding one assistant, growing a small team, or bringing a larger advisor group into JourneyFuse.
Before you add anyone
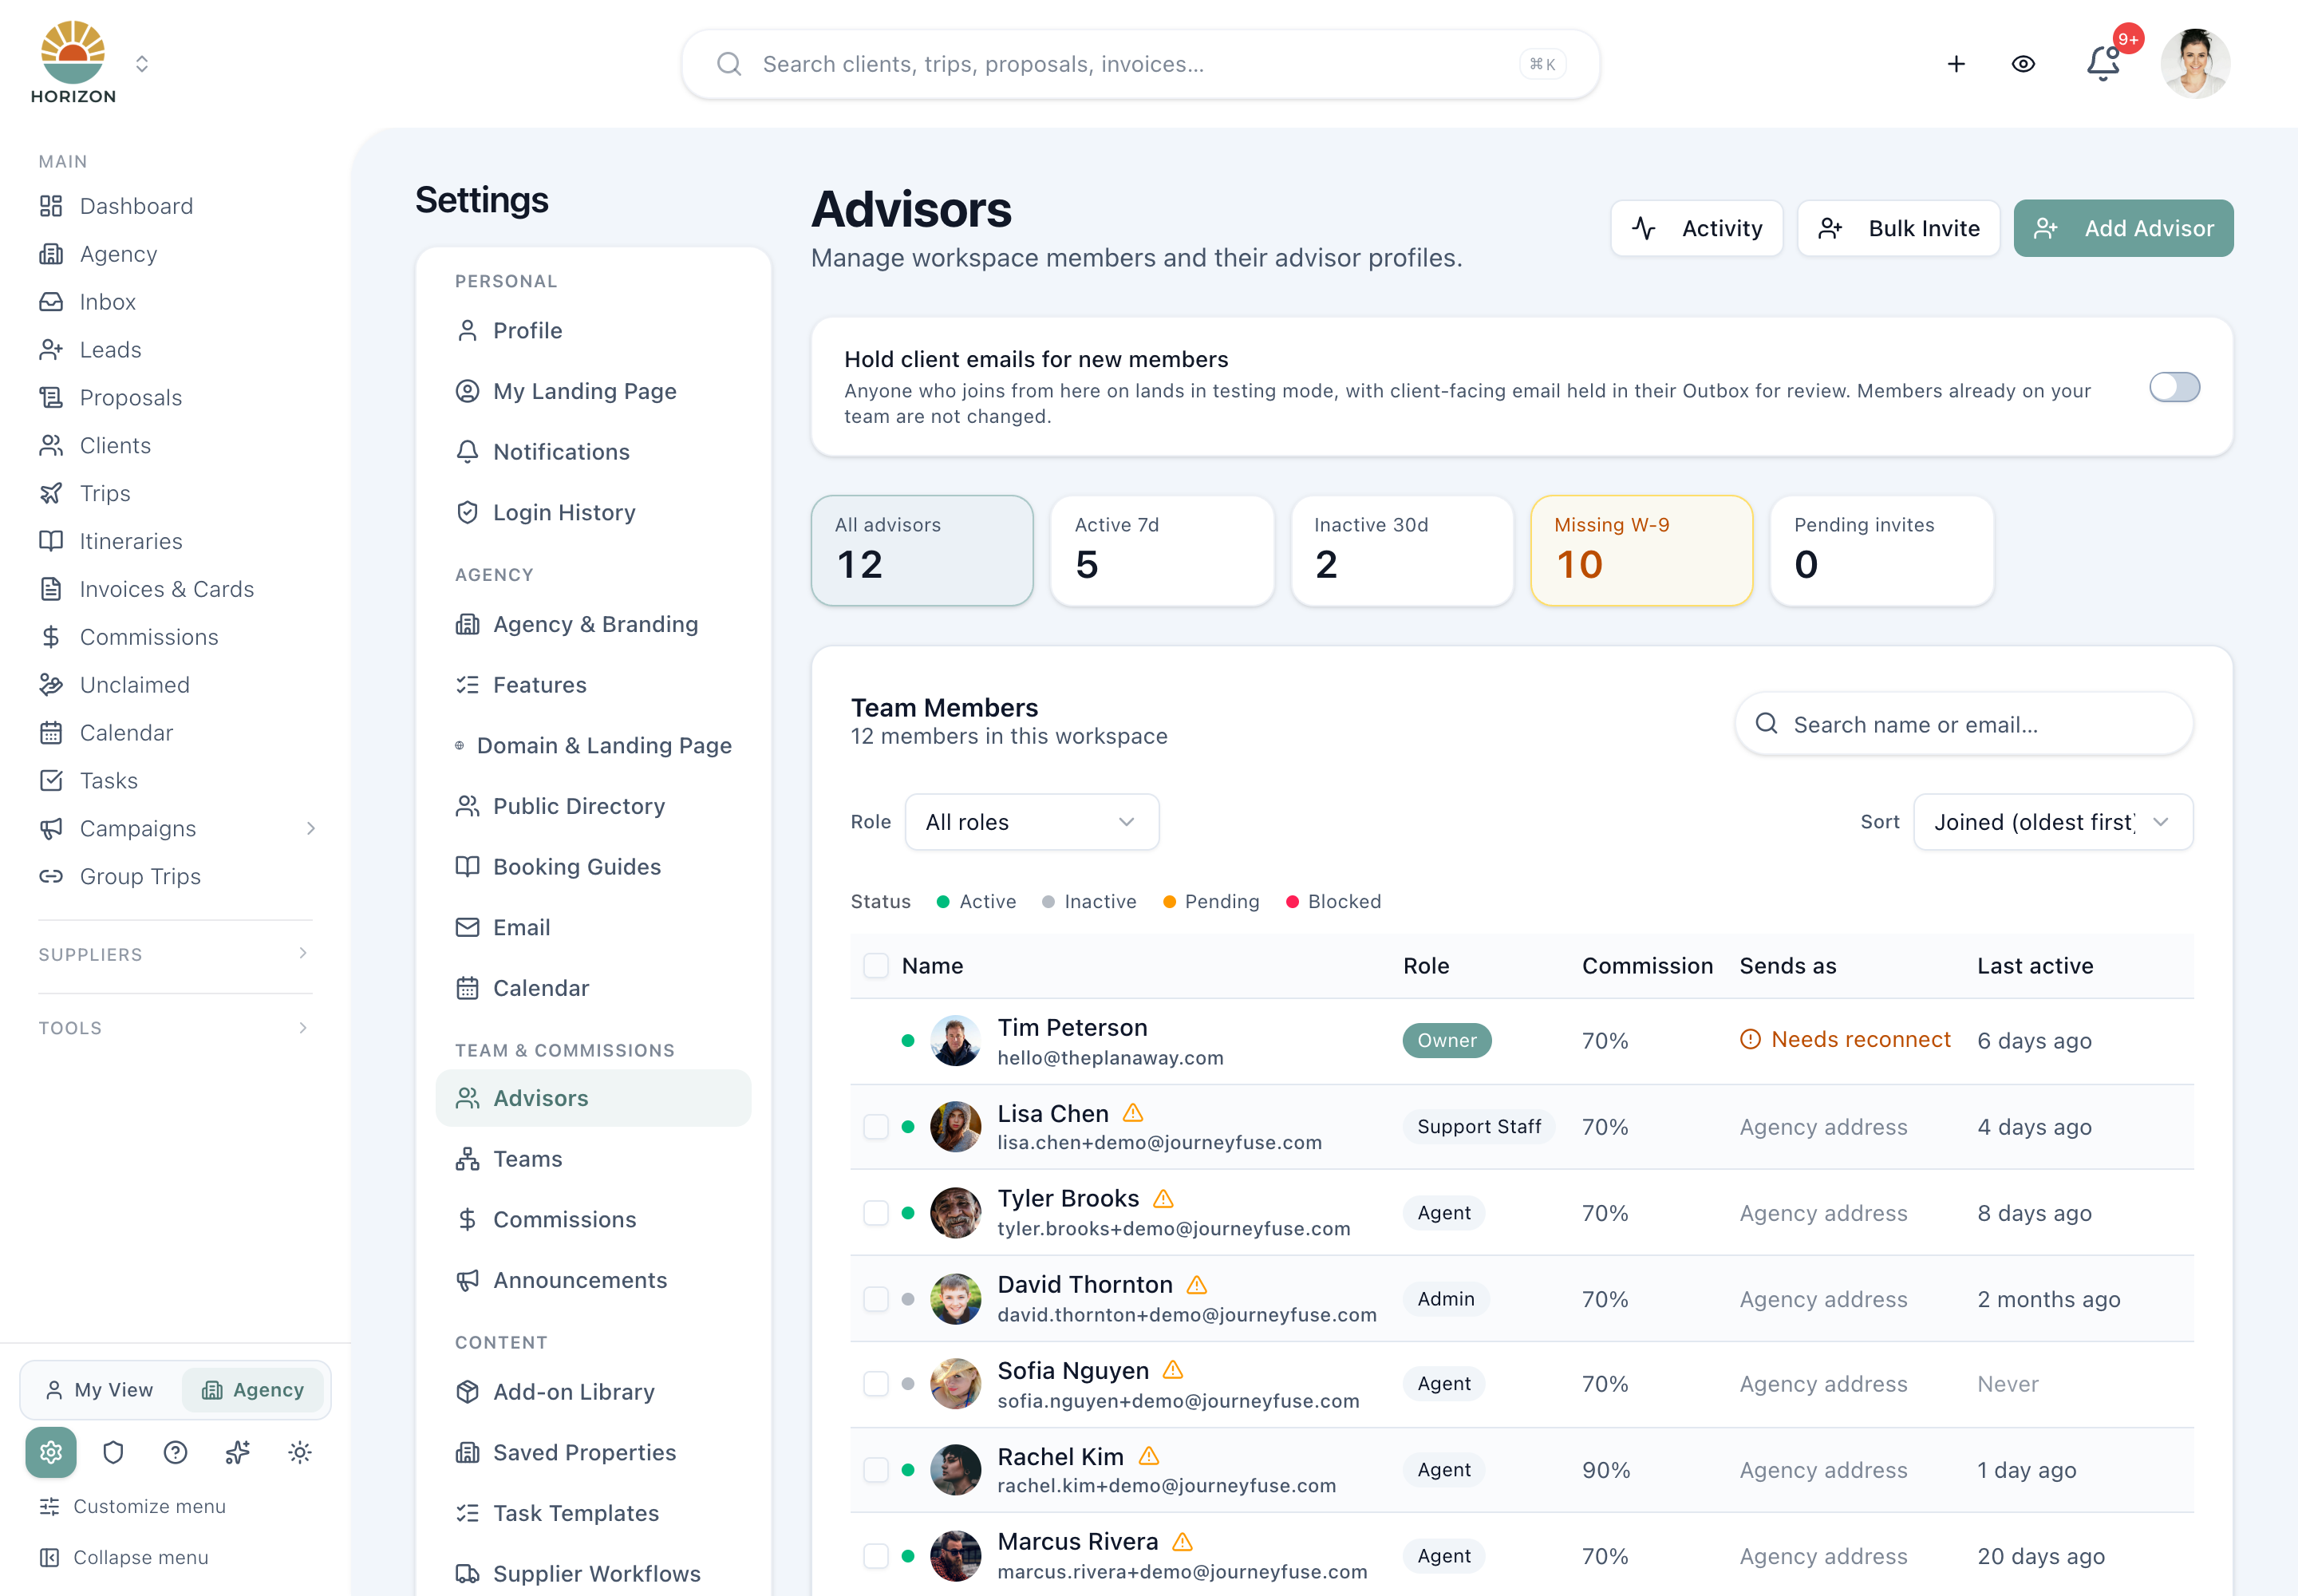
Decide whether to turn on Hold client emails for new members. When it is on, anyone added from this point forward begins on Held for review. Their client-facing emails wait in the Outbox for review instead of going straight to travelers. Existing members are not changed.
This is useful when a new advisor needs time to connect email, learn the agency's templates, and practice with demo trips before communicating with clients.
Add one advisor or staff member
Select Add Advisor. You have two choices:
- Invite now — enter the person's email and role. JourneyFuse sends a set-your-password email as soon as you select Add and send invite.
- Invite later — enter the person's full name, email, and role. No email is sent. They appear as pending activation, and you can assign trips and commissions to them before selecting when to send access.
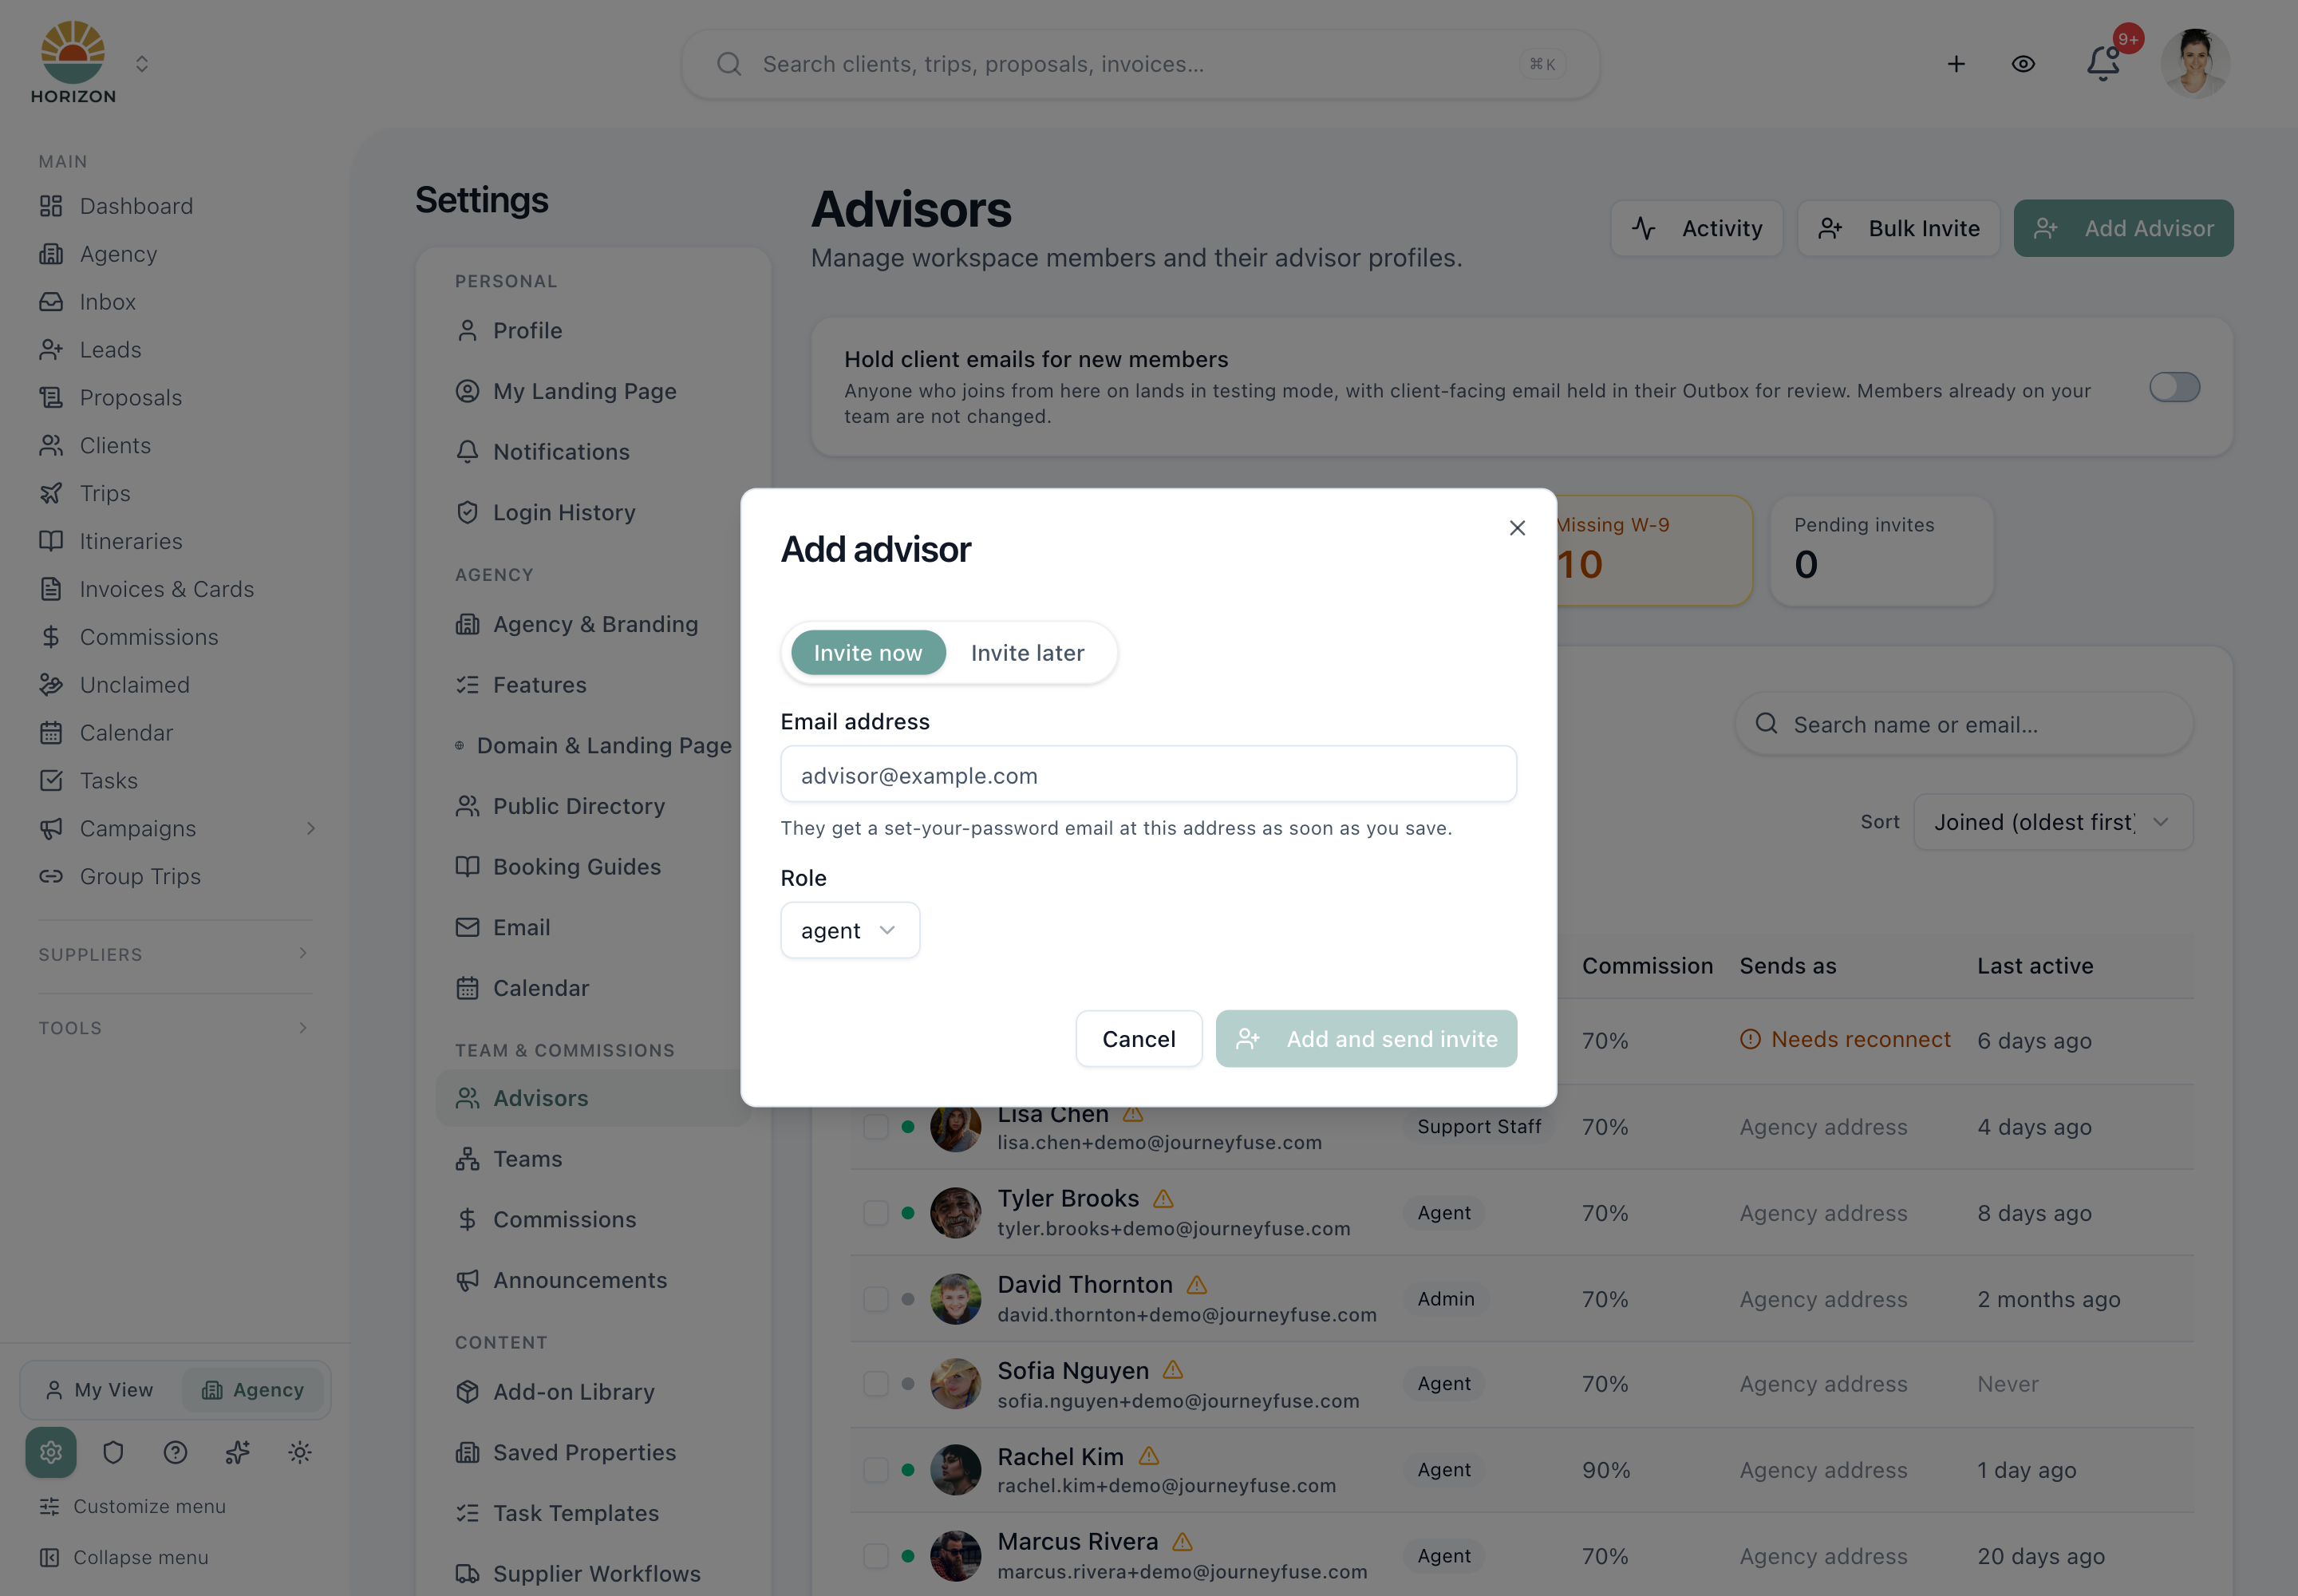
Choose the role based on the work the person needs to do:
- Agent for an advisor managing their own clients and trips.
- Support staff for someone helping the agency without needing advisor financial details.
- Admin only for someone trusted to manage broad agency settings and records.
The roles and permissions lesson explains the access behind each role. You can change a person's role later, so start with the least access they need.
Add several people at once
Choose Bulk Invite when everyone in the batch should receive the same role. Paste email addresses separated by commas, spaces, or new lines. A copied CSV column works too. JourneyFuse counts unique valid addresses, removes duplicates regardless of capitalization, and flags invalid entries. Fix or remove invalid entries before sending. The final result also identifies addresses skipped because they are already members or have a pending invitation.
Use Add Advisor instead when different people need different roles or when you want to stage them with Invite later.
Review the roster and pending invitations
The Advisors page shows the person's status, role, commission split, sender connection, and last activity. Use the summary cards to narrow the roster or jump to invitations: Active 7d, Inactive 30d, Missing W-9, and Pending invites.
Pending invites jumps to invitations that have not been accepted. You can resend a current invitation or cancel one that used the wrong address or is no longer needed.
Pending activation is different: a person added with Invite later is already on your roster, but has not activated access. Use their row menu to Send invite when ready. An empty Pending Invitations list does not mean every roster member has signed in.
Search the roster before adding someone again. If their address changed, use Change email on the existing member instead of creating a duplicate account.
Share one self-join link
The Shareable invite link adds people to your agency without individual invitations. New links grant the Agent role and agency template-editor access. It is not a promise of a separate private workspace. Review the access you intend to grant before sharing; use Add Advisor for a named invitation with a chosen role.
Treat this link like a password. Anyone who has it can join until you turn it off, and the link does not expire on its own. Use direct invitations for a controlled internal team; use the shareable link only when self-enrollment is the experience you want.
Editing Advisor Details
Use the advisor’s row menu and choose Open profile to review their profile and management settings:
- Bio and specialties
- Commission split percentage
- CLIA number
- Business name
- Contact info (phone, email)
Set one advisor’s usual commission split
Click the percentage in the advisor’s Commission column to open Payments directly. Choose Set Override, set the percentage the advisor keeps, and click Save. Choose Use Default and save to return that person to the agency agreement. Clicking the advisor’s name still opens Profile.
An unset person-level split uses the agency default. If both are unset, the fallback is 100% to the advisor; an explicit 0% is a real agreement, not an empty value. This changes the person’s usual split for new commission entries. Existing entries keep their recorded split, and a booking or assigned-lead agreement can use a different rate.
Changing an Agent's Email
When an agent's email changes, update it in place instead of sending a new invitation — a new invite creates a second account and splits their records across two logins. Use the agent’s row menu and choose Change email to move their login to the new address.
Change email updates JourneyFuse and, for host agencies synced with Kajabi, pushes the change back automatically so both systems stay in step. Use it the moment you learn an address changed, before a duplicate can form.
Merging Duplicate Accounts
If an agent already ended up with two logins — usually because a new invite was sent instead of changing their email — JourneyFuse flags it at the top of the Agents page: "N agents may have two accounts."
How duplicates are detected
JourneyFuse compares agents by name and by email shape (near-identical addresses, shared company domains, Gmail dot/plus variants), whether each account is linked to Kajabi, and when they were created. Every suggestion carries a confidence badge so you know how hard to look:
- High confidence — strong signals line up (for example, nearly identical email addresses). Safe to review and merge.
- Likely a match — probably the same person; give it a quick check.
- Weak — verify first — only the name matches. Confirm it's really one person before merging.
Reviewing and merging
Click Review & merge to open the comparison:
- Confirm it's one person. Read the confidence badge and its reasons. The two accounts appear side by side with their Kajabi status, creation date, last sign-in, and how many records each owns — usually enough to tell which one is "real" without contacting the agent. If they're genuinely two different people who happen to share a name, click These are two different people — keep both and they won't be suggested again.
- Choose which account stays. JourneyFuse pre-selects the Kajabi-linked account so webhooks keep reaching it. The other is deleted — but everything it owns (clients, trips, leads, commissions, tasks, and more) moves onto the kept account first, so nothing is lost.
- Choose which email they sign in with. This is separate from which account you keep, and it's the one thing worth confirming with the agent. Pick the address they actually use — JourneyFuse recommends the one they've signed into most recently. If they use a brand-new address that isn't shown, finish the merge and then use Change email to set it.
- Click Merge accounts.
Merging cannot be undone. When a suggestion is low-confidence and you're unsure, reach out to the agent before merging. If three or more accounts share a name, merge two at a time and repeat.
Bulk Reassignment
When an agent leaves or you need to redistribute work, use Bulk Reassign:
- Select the agent whose work you want to reassign
- Choose the new agent to receive the assignments
- Review the preview showing how many clients, leads, and trips will move
- Confirm the reassignment
Clients, leads, and trips move together: if that transfer fails, none of those ownership changes are saved. The result shows the actual number moved. Reassignment does not remove the previous advisor’s workspace access.
JourneyFuse then updates inherited unpaid commission attribution, queued messages, and trip automation ownership using the same rules as an individual trip reassignment. Explicit commission overrides and paid entries stay intact; another advisor’s personal automation is not handed over as shared content. If a follow-up cannot finish, a review notice links to the affected records. Review those items before deactivating the previous advisor or sending messages and payouts. Do not repeat the whole transfer to clear a follow-up warning.
Lead Claiming
When Allow Agent Lead Claiming is enabled in workspace settings, agents can claim unassigned leads directly from the Leads page.
- Unassigned leads show a Claim button
- Agents can only see their own assigned leads (admins see all)
- Admins can also manually assign leads using the agent dropdown on any lead
This is useful for agencies where leads come in from a shared source (website form, referral partner) and agents self-select which leads to work.
Agent Assignment on Leads
Admins can assign any lead to a specific agent using the assignment dropdown in the lead detail view. This dropdown shows all agents in the workspace.
Related Articles
Template Sharing
Share itinerary templates, resource guides, forms, and email templates with your agency or the JourneyFuse community.
Agent Visibility in Team Workspaces
What each role sees across dashboard, trips, clients, commissions, forms and reports — and how JourneyFuse keeps agent workloads separate in a team.
Automatic Lead Routing
Tag advisors with specialties like Disney or Royal Caribbean, then let routing rules assign every new lead automatically, with capacity limits and deadlines.